Buzzings!
Newsletter of the Los Angeles County Beekeepers Association
March 4, 2013 Volume XIII, Issue 3
Mt. Olive Lutheran Church, 3561 Foothill Boulevard, La Crescenta, CA 91214
Next Meeting: April1, 2013 Doors Open 7:00 pm. Start 7:30
Topic for April Meeting: Kodua’s Israel trip – including bees!
Minutes from the March Meeting: Attendance:45, 43 members, 2 guests
Contents in Brief:
Announcements
Insurance for beekeepers
New Business
Raffle
Assembling Woodenware – Walt McBride
Announcements:
Beekeeping 101 classes 3rd Sunday of the month 9am-noon at Bill’s yard. Suits required.
Bee questions – if you have one, write it on a card at the back of the room when you get to meeting, and we’ll do our best to answer them all during our meeting.
American Bee Journal –subscription discount – grab a voucher from Stacy or contact them at 1-888-922-1293 and tell them you’re a LACBA member to get 25% off
Bee Culture subscription discounts – simply contact them at 1-800-289-7668 and let them know you’re a LACBA member to get a discounted subscription
Buzzings – if you’re not getting a copy, let Stacy McKenna know (stacymckenna1@gmail.com) so we can update your information
Don’t forget to grab your nametag and keep it in your glove compartment or such so you have it handy for meetings.
If you want to be listed on our website for honey sales or bee removals, contact Eva Andrews at evaandrews2@gmail.com
Jeremy Jensen knows someone with two 4-frame hand crank extractors for sale. If you’re interested, please contact him to discuss pricing.
Insurance for Beekeepers - Karla Dare
(805) 481-6133, Fax (805) 489-0574
Karla Dare graciously offered to come speak to us about the issues to be aware of regarding apiary insurance, and where coverage would be beneficial.
Most residential homeowner policies exclude business pursuits of any sort, including beekeeping. Also, detached structures (like garages or honey houses) are not often covered.
Generally speaking it is advisable to carry more liability coverage than the value of your net worth to protect your assets, both premises and product. Pick and choose which items and equipment you want to insure – you know what’s most critical and irreplaceable for you – and have your agent provide you with an itemized list of what it would cost to insure each piece.
Business interruption coverage – a fire/flood/theft that affects business at the wrong time of year can adversely affect an entire year’s production/income.
Valuable papers and records insurance – this will provide you with money for materials and labor to recreate invoices, accounting records, employee records, and anything else lost in a catastrophic event. Digital files are also covered.
Commercial auto insurance covers non-owned (employee-owned) autos to cover employees driving their vehicle on company business (like, say, to the hospital during a sting incident or honey-house accident).
Specialized equipment coverage – make sure when you list your vehicles that any customization (lift gates, hive lifts/cranes, trailers, forklifts, etc.) are listed so that the full cost of those modifications is included in your coverage.
Worker’s comp insurance – primary concerns for beekeepers are stings, snake bites, heatstroke, back injuries, etcetera.
Umbrella coverage – these policies usually come in #1million dollar increments, and cover anything not specified in the rest of your coverage, including legal/attorney fees
What if it’s a hobby or you’re keeping bees illegally? Hobbyists might have coverage in their homeowner’s policies, but many carriers will cancel coverage if you tell them about your bees or make claims related to them. Approach your insurance company with a hypothetical question about the idea of keeping bees to investigate their policies – it’s dangerous to present it as a fait accompli.
Karla’s agency provides coverage through American National which provides primarily agricultural and equine insurance.
New Business:
AGdayLA – we have three volunteers and need a few more. From 8:30-1:30 (lunch included) on Thursday May 16 at the Pomona Fairplex Big Red Barn – help teach 3rd and 4th graders about agriculture and its importance in our daily lives, from food to textiles. If you’re interested in helping out, please contact Karl Walker or Mary Landau.
Questions from the Floor
How do you start green comb to help fight mites?
Green plastic foundation has cell sizes for drone production. Put them in the colony during strong nectar flows to encourage comb production. When the frames are full of drone brood, pull them out and freeze them for a couple days, then replace in hive to be cleaned out/refilled by the bees. Charlie has used them in his hobbyist hives and found they worked great. Having two per hive lets you alternate frames every couple days and keep your drone (and accompanying mite) population down.
What’s the best time for a hive split and how do you do it?
Bill and Clyde do splits every month of the year, as long as a colony is strong (verging on overpopulated) and they have spare queens available. Place about 3 frames of brood/nurse bees and two frames of honey in a nuc with the new queen. If the colony is large enough, split enough frames to fill two full deeps. During winter, Hawaii is the best bet for finding queens, but most people do splits from April through July. If you don’t have orders for queens in yet you likely won’t see a shipment until at least May.
Why not split without a queen? It invites Africanization in your hives if you raise your own in this area. Why invite it if you can prevent it?
Is it recommended to remove the entrance reducer during nectar flow?
Yes, if it’s warm enough out and there’s a good nectar flow on, let the girls have as much access as they can get. When the flow drops off (dearth) or you see signs of robbing, close the entrance down again.
Does the group have any extractors available to share?
Several members have extractors they’re willing to loan – contact Kodua Galieti, Keith Roberts, or John Reese to arrange times/locations.
Why use a queen excluder?
Queen excluders can help keep your honey frames free of brood, but some beekeepers find they limit how much honey a hive produces. Experiment with your hive and decide for yourself what works best for you.
How many bees in a nuc?
There are 3500 bees/pound of bees purchased as packages. One pound is about 2 deep frames of bees. A 5 frame deep nuc would be about 8,000 bees.
What is the best technique to capture a feral swarm/hive?
This issue could fill an entire course of classes. Generally though, leave brood comb near them, Then leave to let them find/accumulate near it. Come back and put the frames of comb in the box with the comb, then leave to let them follow the comb into the box. After dark, come back and close up the box. Capped brood comb is the best lure for a colony. Once you’ve boxed them up and moved them, LEAVE THEM ALONE for two weeks to get well established. Getting into the box before then will encourage them to abscond.
Drones – is it normal to have a lot?
Drones this time of year are very populous. But if they are a significant portion of the population, they can be a good indicator of crowding which will lead to swarming – add frames and boxes to give the colony more space. If your colony is composed primarily of drones your queen may have failed (no more semen or only worker-layers left). Check in your hive to see what the brood ratios look like and whether they need more space.
RAFFLE
Thanks to Charlie Marsden for the wine, and to Bill Lewis for the ABF membership!!!
Assembling Woodenware – Walt McBride
There are two main types of Langstroth hives in use by most beekeepers – the 8 frame, and the 10 frame. 10 frame hives are the industry standard, so keeping 8 frame equipment can prove problematic when trying to exchange equipment/colonies with other beekeepers. Keeping mixed equipment within a given apiary quickly becomes a serious hassle, so try to make sure all of your equipment is interchangeable. You can keep bees in just about anything (as evidenced by where swarms choose to take up residence) but keeping to standard measurements means much less headache for the beekeeper. If you’re making your own equipment, try to keep to standard measurements to make supplementing or giving away your equipment easier
Woodenware can be repaired, but in Walt’s experience, preventing damage in the first place is the best way to maintain your equipment. A key element is paint – use a coat of primer and 2 coats of paint. Most decay and damage will happen on the corners, so make sure your joints and ends gets good coverage.
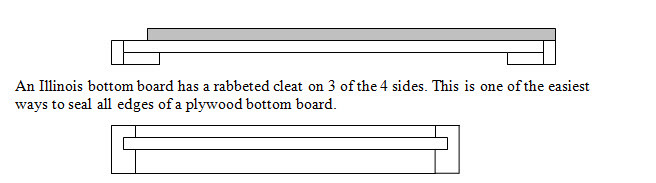
There are several types of bottom board. The Western 4 cleat bottom board uses vertical cleats on the front and back edges to seal the main boar, with additional horizontal cleats under the front and back edges to help keep the bottom board raised off the ground/stand to improve circulation and minimize weathering. The top of the bottom board has a raised strip along three sides with the fourth side being open for the hive entrance.
Generally speaking, though, Walt discourages using anything less than marine-grade plywood for hive parts because it’s so difficult to properly seal the edges. LA Honey currently sells tops made from cedar. You can make it out of just about anything – even lengths of tongue and groove with a cleat on either end to affix them to will do. A table saw is IMMENSELY helpful, especially if you have access to cheap lumber. Otherwise, buying things pre-milled but unassembled is usually the economical way to go.
Hive tops are similar – the Western top is the same as the Western bottom, but without the upper strips. It’s also known as a migratory cover and is the standard for beekeepers who move their bees on pallets for pollination purposes.
The telescoping covers are more like an Illinois bottom and are designed to wrap all around the edges of a hive’s top box. This can be crucial in colder parts of the country where winter condensation or water intrusion is an issue. Here in the arid southwest, it’s usually more trouble than it’s worth. Because of the overhanging lip, telescoping covers do not allow for close packing on pallets for pollination or moving hives to follow a nectar flow. It also means that getting the lids off is harder than sliding a tool under the edge like you can with a Western or Migratory cover. Bees have a tendency to propolis telescoping covers in place, which necessitates the use of an inner cover, a barrier between bees and telescoping top. This is an extra expense, and the inner cover still usually has to be pried off with a hive tool, so it adds an extra step to what migratory cover users are already doing.
One use of inner covers in this region is as a bee escape prior to honey harvesting. By adding a bee escape (a one-way door for bees) to the center of an inner cover, you can slide the inner cover between brood and honey boxes, and 24 hours later come remove the top box assured there are no significant numbers of bees in your harvest. Just make sure you orient your cover with the bee gate flowing DOWN, so you have no bees instead of all the bees in your supers! Be careful, though – vacated honey supers can attract ants.
A Deep box is 9-5/8” deep, and when full of honey a 10-frame box will weigh around 75 pounds. Most beekeepers use these for their brood frames and in-hive feeders. A medium is 6-5/8” deep, and when full of honey a 10-frame box will weigh around 35 pounds. Most beekeepers use these for their honey supers and extra brood space. Some beekeepers use only mediums for the sake of their backs.
If you’re buying your boxes in person, try to dry-fit them on site to make sure none of them are horribly warped or bowed or even potentially mis-milled. The top and bottom edges when assembled should make a smooth, even, flat surface so it meets well with boxes stacked above and below it. Boxes are usually milled out of pine, and they come in several grades. Mills usually try to avoid knots, but especially in the cheaper grades you’ll occasionally get a loose knot. If it comes out they can usually be glued back in with no ill effects on later performance of the box – just make sure it gets adequately painted.
The rabbet for the frames to rest on should be on the INSIDE and the milled handles should be on the OUTSIDE. Seemingly obvious, but occasionally we get so focused on the finger joints fitting we forget these things. The depths of frame rabbets varies from mill to mill – some are 5/8” deep and some are 7/8”. The deeper rabbets will accommodate a metal frame rail, which helps protect your rabbet and makes it easier to clean the box of propolis. The shallower rail can not accommodate a metal rail, as it will lift the top bars high enough that a lid will crush bees on the top bars. Make sure you test fit your intended rails, frames, and boxes to guarantee a bee space above the top bars. Bee spaces are as follows:
¼” spaces will get filled with propolis
5/16” spaces are perfect for bee travel
3/8” spaces will encourage burr comb formation
ASIDE: Rails also are made to help with 9-frame spacing – but make sure you only use 9-frame spacing with already-drawn frames. While 9-frame spacing with drawn frames encourages drawing deeper cells and storing more honey/harvested wax per frame (not to mention some impressively thick cut-comb should they be pretty about it), bees tend to draw out new foundation poorly at 9-frame spacing.
Boxes should be both glued and nailed/stapled together. Any basic wood glue will be adequate, but exterior grade is preferable. Some folk like Gorrilla glue and find the expansion reassuring, but Clyde finds it messy and cumbersome because of its expansion. As always, use what works best for you. Using a 1” brush coat all contacting surfaces – having a warm bucket of water handy helps keep things clean during this process. Working on a flat concrete surface like a driveway or garage floor is usually convenient. Assemble the box while the glue is wet. If the box is bowed or needs help staying together, employ a pipe clamp. A framing square or triangle will help make sure all of your boxes wind up the same shape and thus stack neatly and without gaps.
Each 10-frame deep Langstroth box will require 48 nails to put together. Walt recommends 8d or 7d nails, galvanized and a decent sized hammer. Smaller hammers will need more blows per nail and you’ll wear yourself out. The top finger joints by the rabbet for the frames will benefit from a 6d nail so the wood doesn’t split. Some beekeepers add cleats to the outside of their boxes to make them easier to lift, act as rests for tilting the boxes above, etc. These cleats are usually 1x2 wood strips added along the short sides of the boxes making them easiest to stack on pallets and keep the center of gravity close to the body when lifting. Walt prefers his cleats to not reach all the way to the top edge. Clyde prefers them at the top edge to make lid removal easier and act as a rest for tilting his top boxes.
Boxes can be nailed to the bottom boards (usually from the underside of the bottom board) or left loose. Most migratory beekeepers fasten their bottom boards on, but from the sides using plumbers tape or extra large staples so they can disconnect them as needed without having to overturn the box.
Drip boards are like a bottom board but with no open side. They’re handy when harvesting honey as they keep any dripping frames/broken comb from leaking all over you, the truck, etc. (Ed: I use a large jelly roll pan from Smart &Final or other restaurant supply store – stainless steel cleans easy and doesn’t require painting! But the sun can create quite the glare, and the up-front cost is a bit higher…)
Nuc boxes are basically the same as regular boxes, just narrower – usually 5 frames wide rather than 8 or 10. They are easier for catching swarms (especially when there are ladders involved), and a large eyebolt added on one end allows you to hang them in a convenient spot freeing up even more hands. They are only for transport or temporary use, though – nucs aren’t suitable for homing a full colony in honey season. Stacked nucs can encourage faster comb drawing when there’s a strong nectar flow and lots of bees available as it’s easier to keep the smaller boxes warm.
When moving bees, building some form of screened entrance can allow them better temperature control and water access while still keeping the entrance closed.
When transferring swarms, cardboard boxes are often recommended, but bees will chew the cardboard, so it’s a very temporary solution. When transferring, brood comb is key – Cut segments to fit your frames, and transfer the brood comb first. Walt rubber bands comb into empty deep frames using #33 rubber bands. Sliding a 6d nail in through the wiring holes helps stabilize the comb and prevent floppiness. Give them their own honey back in extra pie plates and such if you run out of frame space. By the time they chew the rubber band off, they’ve usually firmly affixed the comb to the frame.
For new frames, and their foundation, Walt still prefers old fashioned wooden frames with horizontal wires and beeswax foundation. Due to time constraints, we’ll cover wiring frames at a later date. Foundations gets drawn best when there’s a good nectar flow on. If the flow is weak, bees will chew on the new foundation for the nutritive value or to re-use the wax elsewhere. There are alternatives like plastic foundation for wooden frames, fully plastic frames of foundation, or even fully plastic “Permacomb” or “Honey Super Cell” where each cell is already formed in plastic. While the Permacomb had the advantages of imperviousness to wax moth and no need to draw the comb, it was significantly heavier than natural comb and didn’t really catch on. Many beekeepers enjoy plastic foundation or combs for their lake of effort required and re-usability (though many high-volume beekeepers find replacing cheaper/easier than scraping/re-using).
[Minutes submitted by Stacy McKenna, LACBA Secretary.]